1 - Portals
createPortal 是 React DOM 提供的一个方法,它允许你将组件渲染到 DOM 树结构中的不同位置,而不是作为其父组件的子节点渲染。
在 React 中,组件通常会渲染到其父组件 DOM 节点内部。然而,createPortal 提供了一种“传送门”机制,让你可以将一个 React 元素渲染到 DOM 树中的任何现有节点上,即使这个节点不在该 React 组件的父级 DOM 结构中。
createPortal 的语法
createPortal 接收两个参数:
child:任何可渲染的 React 子元素,例如 JSX 元素、字符串、片段(Fragment)等。container:一个 DOM 元素。这个元素是你希望 Portal 渲染到的目标 DOM 节点。
核心原理
虽然 Portal 渲染的 DOM 节点在视觉上位于 DOM 树的其他位置,但在 React 内部,它仍然是定义它的组件的子组件。这意味着:
- 事件冒泡: Portal 内部的事件仍然会像正常 React 组件一样冒泡到 React 树中它们的父组件和祖先组件,即使 DOM 节点在物理上很远。
- Context: Portal 内部的组件仍然可以访问到 React 树中定义它的组件所提供的 Context。
基本使用
创建一个AlertMessage组件,并使用它。
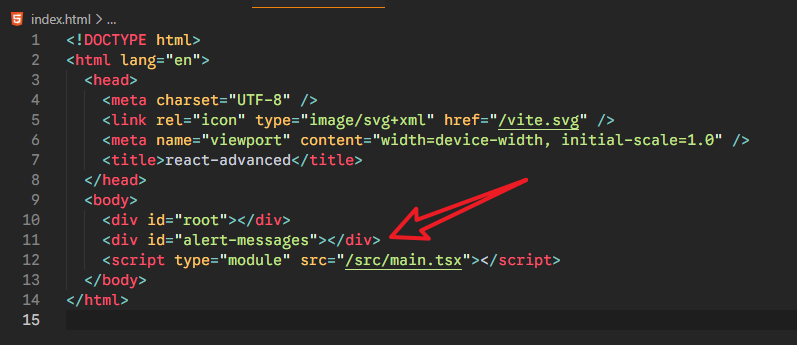
xxxxxxxxxx431// react-advanced\src\Portal.tsx23import { useState } from "react";4import { createPortal } from "react-dom";56export const Portal = () => {7 const [isOpen, setIsOpen] = useState(false);89 return (10 <div>11 <h1>App Content</h1>12 <button onClick={() => setIsOpen(true)}>Show Message</button>13 <AlertMessage isOpen={isOpen} onClose={() => setIsOpen(false)}>14 Secret Message15 <br />16 Click to close17 </AlertMessage>18 </div>19 );20};2122function AlertMessage({ children, onClose, isOpen }) {23 if (!isOpen) return null;2425 return createPortal(26 <div27 onClick={onClose}28 style={{29 cursor: "pointer",30 position: "absolute",31 top: ".5rem",32 left: "50%",33 translate: "-50%",34 background: "#777",35 color: "white",36 borderRadius: ".5rem",37 padding: ".5rem",38 }}>39 {children}40 </div>,41 document.getElementById("alert-messages")!42 );43}需要在public/index.html里面,创建一个单独的挂载节点,避免挂载到body上,造成app里面页面的重绘重排。
效果:
注意:
- 使用createPortal的时候,不要将组件挂载到body上。要创建一个单独的挂载点。
- Portal 内部的事件仍然会像正常 React 组件一样冒泡到 React 树中它们的父组件和祖先组件,即使 DOM 节点在物理上很远。所以在定义portal组件里面的事件的时候,需要使用
e.stopPropagation()方法,来阻止事件冒泡。
详情可以看react实践这个文档里面。
2 - Passing Refs to Components
我们会使用useRef来引用DOM元素或react组件,当我们直接在组件里面赋值给DOM元素的时候,是OK的。
xxxxxxxxxx221// src/PassRef.tsx23import { useRef } from "react";45export const PassRef = () => {6 const inputRef = useRef(null);78 const handleSubmit = (e: React.FormEvent<HTMLFormElement>) => {9 // 1. 阻止表单默认提交行为 (会刷新页面)10 e.preventDefault();1112 if (inputRef.current) {13 console.log(inputRef.current.value);14 }15 };16 return (17 <form onSubmit={handleSubmit}>18 <input type="text" ref={inputRef} style={{ border: "2px solid green" }} />19 <button type="submit">Submit</button>20 </form>21 );22};效果是OK的:
问题是:怎么将ref传递给子组件呢?
在react19中,可以直接将ref传递给子组件了。react19一下的版本,需要用到forwardRef,下节课会讲到。
xxxxxxxxxx281// src/PassRef.tsx23import { useRef } from "react";45export const PassRef = () => {6 const inputRef = useRef(null);78 const handleSubmit = (e: React.FormEvent<HTMLFormElement>) => {9 // 1. 阻止表单默认提交行为 (会刷新页面)10 e.preventDefault();1112 if (inputRef.current) {13 console.log(inputRef.current.value);14 }15 };16 return (17 <form onSubmit={handleSubmit}>18 {/* 直接将ref传递给子组件 */}19 <CustomInput ref={inputRef} />20 <button type="submit">Submit</button>21 </form>22 );23};2425function CustomInput({ ref }: { ref: React.Ref<HTMLInputElement> }) {26 // 子组件中直接使用传递过来的ref27 return <input type="text" ref={ref} style={{ border: "2px solid green" }} />;28}效果还是OK的。
3 - forwardRef
forwardRef 是 React 提供的高阶组件(Higher-Order Component, HOC)函数,它允许父组件将 ref 属性作为普通的参数向下传递(转发)给其子组件内部的 DOM 节点或另一个 React 组件。
只需要将子组件使用forwardRef包裹起来就行了,非常简单。
1、定义一个CustomInput组件
xxxxxxxxxx141// components/CustomInput.tsx23import { forwardRef } from "react";45export const CustomInput = forwardRef<HTMLInputElement>((props, ref) => {6 return (7 <input8 type="text"9 {props}10 ref={ref}11 style={{ border: "2px solid green" }}12 />13 );14});2、使用这个组件
xxxxxxxxxx221import { useRef } from "react";2import { CustomInput } from "../components/CustomInput";34export const PassRef = () => {5 const inputRef = useRef(null);67 const handleSubmit = (e: React.FormEvent<HTMLFormElement>) => {8 // 1. 阻止表单默认提交行为 (会刷新页面)9 e.preventDefault();1011 if (inputRef.current) {12 console.log(inputRef.current.value);13 }14 };15 return (16 <form onSubmit={handleSubmit}>17 {/* 直接将ref传递给子组件 */}18 <CustomInput ref={inputRef} />19 <button type="submit">Submit</button>20 </form>21 );22};使用OK:
需要注意的是,在使用forwardRef时,里面的组件函数的参数,ref参数一定要放到所有参数的最后一个,这样才能单独指定。
4 - Modal Introduction
这节课讲解了一下在html+css+js代码中,怎么实现modal。参考:https://github.com/WebDevSimplified/React-Simplified-Advanced-Projects/tree/main/01-modal/before
方式一:使用div,让display在none和block之间切换来显示/隐藏。
方式二:使用dialog元素,通过操作它的showModal()和close()方法,可以显示/隐藏。
5 - Modal Walkthrough
这节课讲解怎么在react中实现modal。还是可以有两种方式,但是必须使用createPortal方法。
1、使用div来创建Modal
①编写样式
xxxxxxxxxx221.modal {2 position: absolute;3 top: 50%;4 left: 50%;5 translate: -50% -50%;6 padding: 1rem;7 background-color: white;8 border: 1px solid black;9 z-index: 1;10}1112/* 兄弟类名 */13.modal-overlay.show {14 display: block;15}1617.modal-overlay {18 display: none;19 position: absolute;20 inset: 0;21 background: rgba(0,0,0,0.1);22}就是利用.modal-overlay的display属性来显示/隐藏。
②编写组件
xxxxxxxxxx181// components/CustomModal.tsx23import { createPortal } from "react-dom";45type ICustomModal = {6 isOpen: boolean;7 onClose: () => void;8 children: React.ReactNode;9};1011export const CustomModal = ({ isOpen, onClose, children }: ICustomModal) => {12 return createPortal(13 <div className={`modal-overlay ${isOpen && "show"}`}>14 <div className="modal">{children}</div>15 </div>,16 document.querySelector("#modal-root")!17 );18};③使用组件
xxxxxxxxxx251// App.tsx23import "./App.css";4import { CustomModal } from "../components/CustomModal";5import { useState } from "react";67function App() {8 const [isCustomModalOpen, setIsCustomModalOpen] = useState(false);9 10 return (11 <>12 <button onClick={() => setIsCustomModalOpen(true)}>13 Show Custom Modal14 </button>15 <CustomModal16 isOpen={isCustomModalOpen}17 onClose={() => setIsCustomModalOpen(false)}>18 <p>This is a Custom modal</p>19 <button onClick={() => setIsCustomModalOpen(false)}>Close</button>20 </CustomModal>21 </>22 );23}2425export default App;可以看到,效果OK:
④为modal添加键盘的escape键事件,当按这个键的时候,也可以关闭弹窗
xxxxxxxxxx391// components/CustomModal.tsx23import { useEffect } from "react";4import { createPortal } from "react-dom";56type ICustomModal = {7 isOpen: boolean;8 onClose: () => void;9 children: React.ReactNode;10};1112export const CustomModal = ({ isOpen, onClose, children }: ICustomModal) => {13 // 添加监听事件14 useEffect(() => {15 function handler(e: KeyboardEvent) {16 // 当用户按下escape键时,执行onClose方法。17 if (e.key === "Escape") {18 onClose();19 }20 }2122 document.addEventListener("keydown", handler);2324 return () => {25 document.removeEventListener("keydown", handler);26 };27 /**28 * 如果 onClose 函数不变 (稳定): React 会保证 handler 函数只在组件挂载时创建一次。29 * 如果 onClose 函数改变: 如果父组件导致 onClose 引用发生变化(例如,父组件重新渲染时重新定义了 onClose),useEffect 机制将触发重新运行。30 */31 }, [onClose]);3233 return createPortal(34 <div className={`modal-overlay ${isOpen && "show"}`}>35 <div className="modal">{children}</div>36 </div>,37 document.querySelector("#modal-root")!38 );39};可以看到,鼠标没有动,按下escape键就关闭modal了。
2、使用dialog元素来实现Modal
dialog元素,通过操作它的showModal()和close()方法,可以显示/隐藏。
①编写组件
xxxxxxxxxx321// components/DialogModal.tsx23import { useEffect, useRef } from "react";4import { createPortal } from "react-dom";56type IDialogProps = {7 isOpen: boolean;8 onClose: () => void;9 children: React.ReactNode;10};1112export const DialogModal = ({ isOpen, onClose, children }: IDialogProps) => {13 const dialogRef = useRef<HTMLDialogElement | null>(null);1415 useEffect(() => {16 const dialog = dialogRef.current;1718 if (dialog === null) return;1920 if (isOpen) {21 dialog.showModal();22 } else {23 dialog.close();24 }25 }, [isOpen]);2627 // 可以看到,UI代码里面很简单28 return createPortal(29 <dialog ref={dialogRef}>{children}</dialog>,30 document.querySelector("#modal-root")!31 );32};②引用组件
xxxxxxxxxx251// App.tsx23import "./App.css";4import { DialogModal } from "../components/DialogModal";5import { useState } from "react";67function App() {8 const [isDialogModalOpen, setIsDialogModalOpen] = useState(false);910 return (11 <>12 <button onClick={() => setIsDialogModalOpen(true)}>13 Show Dialog Modal14 </button>15 <DialogModal16 isOpen={isDialogModalOpen}17 onClose={() => setIsDialogModalOpen(false)}>18 <p>This is a Dialog modal</p>19 <button onClick={() => setIsDialogModalOpen(false)}>Close</button>20 </DialogModal>21 </>22 );23}2425export default App;效果OK:
③有一个问题
dialog元素默认支持使用escape键来关闭,但当使用escape键关闭之后,就再也不能打开了。这是因为此时的isDialogModalOpen仍然为true,所以就会默认此种状态。
所以要在dialog上加一个useEffect来监听close事件,当close事件发生时,执行onClose方法。
xxxxxxxxxx441// components/DialogModal.tsx23import { useEffect, useRef } from "react";4import { createPortal } from "react-dom";56type IDialogProps = {7 isOpen: boolean;8 onClose: () => void;9 children: React.ReactNode;10};1112export const DialogModal = ({ isOpen, onClose, children }: IDialogProps) => {13 const dialogRef = useRef<HTMLDialogElement | null>(null);1415 useEffect(() => {16 const dialog = dialogRef.current;1718 if (dialog === null) return;1920 if (isOpen) {21 dialog.showModal();22 } else {23 dialog.close();24 }25 }, [isOpen]);2627 useEffect(() => {28 const dialog = dialogRef.current;2930 if (dialog === null) return;3132 dialog.addEventListener("close", onClose);3334 return () => {35 dialog.removeEventListener("close", onClose);36 };37 }, [onClose]);3839 // 可以看到,UI代码里面很简单40 return createPortal(41 <dialog ref={dialogRef}>{children}</dialog>,42 document.querySelector("#modal-root")!43 );44};可以看到,鼠标没有移动,使用escape键关闭dialog之后,可以正常打开。

6 - Error Boundaries
react16之后,提供了ErrorBoundary功能。错误边界 是一个 React 组件,它能够捕获其子组件树中任意位置发生的 JavaScript 错误,记录这些错误,并显示一个 备用 (fallback) UI,而不是让整个应用崩溃。
注意:是里面的子组件如果有JS错误,就会造成整个应用崩溃。所以ErrorBoundary组件很重要。
创建
ErrorBoundary是react中唯一一个必须使用class component来创建的组件。并且需要定义以下两个或其中一个特殊的生命周期方法:
static getDerivedStateFromError(error)
这是一个 静态方法,用于在子组件抛出错误后渲染备用 UI。
- 作用: 它接收抛出的错误对象作为参数,并返回一个对象,该对象用于更新组件的状态(例如,设置
hasError: true)。 - 执行时间: 在渲染阶段(render phase)执行。
componentDidCatch(error, errorInfo)
这是一个非静态方法,用于在子组件抛出错误后执行副作用。
- 作用: 它接收错误对象 (
error) 和一个包含组件栈信息 (errorInfo) 的对象作为参数。 - 执行时间: 在提交阶段(commit phase)执行。
- 主要用途: 记录错误信息(例如,发送到日志服务如 Sentry 或 LogRocket)。
组件示例如下,这个组件的功能已经完成了。剩下需要考虑的就是在哪里使用这个组件,并且做好fallback页面。
xxxxxxxxxx411// ErrorBoundary.tsx23import { Component, type ReactNode } from "react";45// 定义props类型6interface ErrorBoundaryProps {7 children: ReactNode;8 fallback: ReactNode;9}1011// 定义state类型12interface ErrorBoundaryState {13 hasError: boolean;14}1516export default class ErrorBoundary extends Component<17 ErrorBoundaryProps,18 ErrorBoundaryState19> {20 state = {21 hasError: false,22 };2324 static getDerivedStateFromError(error: Error) {25 return { hasError: true };26 }2728 componentDidCatch(error: Error): void {29 // 这里可以使用error来做日志30 console.log("Error: ", error.message);31 }3233 render() {34 // 如果有错误,就显示传递过来的fallback属性的内容,一般是一些组件35 if (this.state.hasError) {36 return this.props.fallback;37 }3839 return this.props.children;40 }41}哪些地方需要用到ErrorBoundary
① 一定要在App外层包裹一个ErrorBoundary,防止任何意想不到的错误的发生。作为最后的防线,捕获任何未被子级错误边界处理的全局性、渲染阶段的错误。
Fallback UI: 在这里,Fallback UI 可能是一个通用的错误页面,包含一个“刷新”或“回到首页”的按钮,因为此时应用的大部分内容可能已崩溃。
xxxxxxxxxx151// src/main.tsx23import { StrictMode } from 'react'4import { createRoot } from 'react-dom/client'5import './index.css'6import App from './App.tsx'7import ErrorBoundary from "../components/ErrorBoundary.tsx";89createRoot(document.getElementById("root")!).render(10 <StrictMode>11 <ErrorBoundary fallback={<h2>Oops, an unexpected error occured!</h2>}>12 <App />13 </ErrorBoundary>14 </StrictMode>15);② 路由/页面级 (Route/Page-Level),裹路由配置中每个页面的主要组件,确保一个页面的崩溃不会影响到其他页面或应用的导航结构。
xxxxxxxxxx111<Routes>2 <Route path="/" element={<HomePage />} />3 <Route 4 path="/profile" 5 element={6 <ErrorBoundary fallback={<ProfileError />}>7 <UserProfile /> 8 </ErrorBoundary>9 } 10 />11</Routes>③ 独立且关键的 UI 模块,隔离那些拥有复杂逻辑或依赖外部数据、但其崩溃不应影响整个页面的组件。
ErrorBoundary只在核心位置使用,不要过度使用;并且Fallback界面要提供有用的信息及恢复操作;要收集错误日志,利用 componentDidCatch 方法将错误信息发送到外部日志服务(如 Sentry, LogRocket, Splunk 等),这是错误边界的关键价值之一。
错误边界不能捕获什么
错误边界只能捕获其子组件树中发生的错误。它不能捕获以下类型的错误:
- 事件处理器内部的错误 (Errors inside event handlers): 事件处理器是在 React 的同步事件流之外运行的。如果你需要处理这些错误,请使用标准的 JavaScript
try/catch语句。 - 异步代码内部的错误 (Errors inside asynchronous code): 例如
setTimeout或Promise.then()中的错误。 - 错误边界组件自身的错误: 如果
ErrorBoundary组件自身在其render方法中抛出错误,它将无法捕获自己。这个错误就一定要避免。 - 服务端渲染 (SSR) 时的错误: 错误边界仅在客户端渲染(Client-Side Rendering)期间捕获错误。
7 - Advanced Key Users
这节课学习一个重要概念,how react handle state preservation between different rerenders.
先看一个案例:
创建子组件Counter:
xxxxxxxxxx141// components/Counter.tsx23import { useState } from "react";45export const Counter = () => {6 const [count, setCount] = useState(0);7 return (8 <>9 <button onClick={() => setCount((c) => c - 1)}>-</button>10 {count}11 <button onClick={() => setCount((c) => c + 1)}>+</button>12 </>13 );14};在父组件中使用它:
xxxxxxxxxx271// components/CounterFather.tsx23import { useState } from "react";4import { Counter } from "./Counter";56export const CounterFather = () => {7 const [changeDogs, setChangeDogs] = useState(false);89 return (10 <div>11 {changeDogs ? (12 <>13 <span># of Dogs:</span>14 <Counter />15 </>16 ) : (17 <>18 <span># of Cats:</span>19 <Counter />20 </>21 )}2223 <br />24 <button onClick={() => setChangeDogs((d) => !d)}>Switch</button>25 </div>26 );27};注意看,当Switch切换时,Couter状态会保留吗?

可以看到Counter的状态保留了。
疑问:为什么会出现这样的情况呢?我明明使用了两个Counter组件,为什么它们的状态是共享的?
原因:在react中,当它判断组件的状态时,实际上react并不会关注是哪个组件,它关注的是组件在组件树中的位置。
React 默认通过 组件在 JSX 结构中的位置 来确定组件的身份,而不是组件的类型。你在 changeDogs ? <Counter /> : <Counter /> 写的是两个位置完全一样的 <Counter />,React 看到类型相同、位置相同、没有 key,就认为“这是同一个组件只是文本变了”,所以它根本没有卸载旧的 Counter,而是直接复用了它的 DOM 和 state!
解决办法:在使用Counter组件时,加上key属性。就是显式地告诉 React,在 changeDogs 状态切换时,这两个 <Counter /> 实际上是两个不同的组件,即使它们在代码中的位置看起来相似。
xxxxxxxxxx271// CounterFather.tsx23import { useState } from "react";4import { Counter } from "./Counter";56export const CounterFather = () => {7 const [changeDogs, setChangeDogs] = useState(false);89 return (10 <div>11 {changeDogs ? (12 <>13 <span># of Dogs:</span>14 <Counter key="dogs" />15 </>16 ) : (17 <>18 <span># of Cats:</span>19 <Counter key="cats" />20 </>21 )}2223 <br />24 <button onClick={() => setChangeDogs((d) => !d)}>Switch</button>25 </div>26 );27};这样就正常了:
这是react中经典的组件身份和状态保留问题,如果在写项目时,遇到了这种现象,要想到怎么解决。
8 - Capture Event Listeners
在react中,一般事件传播的过程都是事件冒泡。
事件冒泡(Event Bubbling)是一种 DOM 事件传播机制,当一个元素上的事件被触发时,该事件会从触发元素开始,逐层向父元素、祖父元素,一直冒泡(传递)到文档根节点 (document) 的过程,就像水底的泡泡上升一样,它允许父元素统一处理子孙元素发生的事件。
像最经典的onClick事件,就会引起事件冒泡。
但是有时候我们想使用事件捕获,应该怎么做呢?需要在事件捕获的元素上面,都使用事件捕获监听器。
要在 React 中注册捕获事件监听器,你只需在标准的事件属性名称后面添加 Capture 后缀即可:
| 冒泡阶段监听器 (默认) | 捕获阶段监听器 |
|---|---|
onClick | onClickCapture |
onMouseDown | onMouseDownCapture |
onKeyDown | onKeyDownCapture |
onChange | onChangeCapture |
使用场景:
- 阻止事件向下传播(拦截)
如果你需要在事件到达目标元素之前就阻止它的传播,你可以使用捕获监听器。
- 跨组件实现全局行为(例如 Modal 外部点击)
当你需要实现一个功能,比如点击模态框(Modal)外部的任何地方来关闭它时,全局捕获监听器很有用。
9 - Date Picker Introduction
https://github.com/WebDevSimplified/React-Simplified-Advanced-Projects/tree/main/02-date-picker/before,这里提供了老师通过html+js+css实现的DatePicker功能。
10 - Date Picker Walkthrough
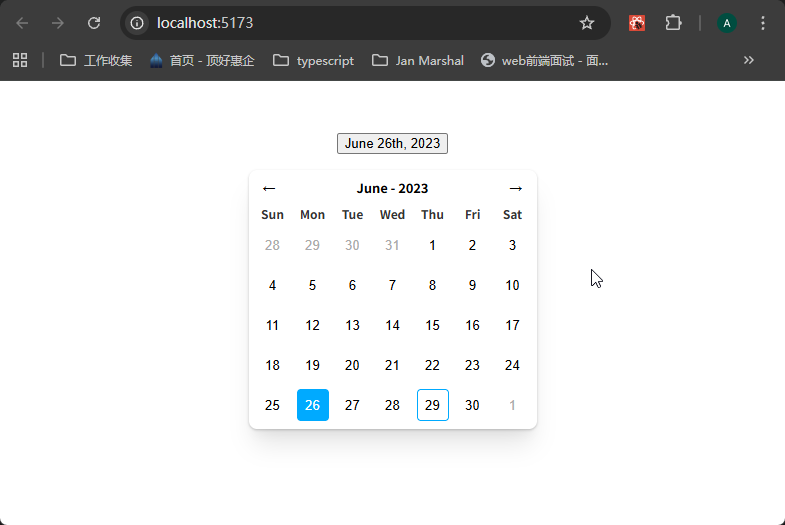
不使用Portal来实现DatePicker,因为date的选择框是紧跟着DatePicker按钮的,所以放在一起。
1、安装date-fns库,用来处理日期。
2、将第九节课老师定义好的样式代码copy下来,然后将DatePicker的HTML代码直接copy到组件中,可以看到样式已经出来了,交互功能还没有:
3、将modal相关的代码提取出来,添加显示/隐藏功能
做到这一步就很不错了,如果要我来做,我会感觉到无从下手,所以这一步是怎么实现的,一定要搞清楚。
xxxxxxxxxx421// components/DatePicker.tsx23import { useState } from "react";45export const DatePicker = () => {6 const [isOpen, setIsOpen] = useState(false);78 return (9 <div className="date-picker-container">10 <button11 className="date-picker-button"12 onClick={() => setIsOpen((o) => !o)}>13 June 26th, 202314 </button>15 {isOpen && <DatePickerModal />}16 </div>17 );18};1920const DatePickerModal = () => {21 return (22 <div className="date-picker">23 <div className="date-picker-header">24 <button className="prev-month-button month-button">←</button>25 <div className="current-month">June - 2023</div>26 <button className="next-month-button month-button">→</button>27 </div>28 <div className="date-picker-grid-header date-picker-grid">29 <div>Sun</div>30 <div>Mon</div>31 <div>Tue</div>32 <div>Wed</div>33 <div>Thu</div>34 <div>Fri</div>35 <div>Sat</div>36 </div>37 <div className="date-picker-grid-dates date-picker-grid">38 ......39 </div>40 </div>41 );42};效果:
4、实现功能
这一步实现了下面的功能:
使用lift up state,将状态定义在使用DatePicker的组件里面,传递值和setState方法过来处理
使用date-fns的addMonths函数,处理月份的问题
显示日期,特别是上个月或者下个月的日期,怎么得到?需要使用date-fns里面的多个方法:
xxxxxxxxxx161import {2format,3addMonths,4eachDayOfInterval,5startOfWeek,6startOfMonth,7endOfWeek,8endOfMonth,9} from "date-fns";1011const visibleDates = eachDayOfInterval({12// datepicker表里面,其实是按照周来显示的,所以可以先求当前月的第一天,然后求这一天所在周的第一天13start: startOfWeek(startOfMonth(visibleMonth)),14// 先求当前月的最后一天,然后求这一天所在周的最后一天15end: endOfWeek(endOfMonth(visibleMonth)),16});使用date-fns的
isSameMonth方法,可以很方便的判断出日期是不是属于当前月;使用isSameDay,判断是不是同一天;使用isToday,判断是不是今天。分别加上样式。xxxxxxxxxx131<div className="date-picker-grid-dates date-picker-grid">2{visibleDates.map((date) => (3<button4className={`date ${5!isSameMonth(date, visibleMonth) && "date-picker-other-month-date"6} ${isSameDay(date, value) && "selected"} ${7isToday(date) && "today"8}`}9key={date.toLocaleString()}>10{date.getDate()}11</button>12))}13</div>然后为button添加一个点击事件,
onClick={() => onChange(date)},功能就完成了。
完整代码如下:
xxxxxxxxxx1011// components/DatePicker.tsx23import { useState } from "react";4import {5 format,6 addMonths,7 eachDayOfInterval,8 startOfWeek,9 startOfMonth,10 endOfWeek,11 endOfMonth,12 isSameMonth,13 isSameDay,14 isToday,15} from "date-fns";1617type IDatePickerProps = {18 value: Date;19 onChange: (date: Date) => void;20};2122export const DatePicker = ({ value, onChange }: IDatePickerProps) => {23 const [isOpen, setIsOpen] = useState(false);2425 return (26 <div className="date-picker-container">27 <button28 className="date-picker-button"29 onClick={() => setIsOpen((o) => !o)}>30 {value === null ? "Select a date" : format(value, "MMM do, yyyy")}31 </button>32 {isOpen && <DatePickerModal value={value} onChange={onChange} />}33 </div>34 );35};3637const DatePickerModal = ({ value, onChange }: IDatePickerProps) => {38 const [visibleMonth, setVisibleMonth] = useState(value || new Date());3940 // eachDayOfInterval返回start和end之间的日期,是一个数组。41 const visibleDates = eachDayOfInterval({42 // datepicker表里面,其实是按照周来显示的,所以可以先求当前月的第一天,然后求这一天所在周的第一天43 start: startOfWeek(startOfMonth(visibleMonth)),44 // 先求当前月的最后一天,然后求这一天所在周的最后一天45 end: endOfWeek(endOfMonth(visibleMonth)),46 });4748 const showPreviousMonth = () => {49 setVisibleMonth((currentMonth) => {50 return addMonths(currentMonth, -1);51 });52 };5354 const showNextMonth = () => {55 setVisibleMonth((currentMonth) => {56 return addMonths(currentMonth, 1);57 });58 };59 return (60 <div className="date-picker">61 <div className="date-picker-header">62 <button63 className="prev-month-button month-button"64 onClick={showPreviousMonth}>65 ←66 </button>67 <div className="current-month">68 {format(visibleMonth, "MMM - yyyy")}69 </div>70 <button71 className="next-month-button month-button"72 onClick={showNextMonth}>73 →74 </button>75 </div>76 <div className="date-picker-grid-header date-picker-grid">77 <div>Sun</div>78 <div>Mon</div>79 <div>Tue</div>80 <div>Wed</div>81 <div>Thu</div>82 <div>Fri</div>83 <div>Sat</div>84 </div>85 <div className="date-picker-grid-dates date-picker-grid">86 {visibleDates.map((date) => (87 <button88 onClick={() => onChange(date)}89 className={`date ${90 !isSameMonth(date, visibleMonth) && "date-picker-other-month-date"91 } ${value && isSameDay(date, value) && "selected"} ${92 isToday(date) && "today"93 }`}94 key={date.toLocaleString()}>95 {date.getDate()}96 </button>97 ))}98 </div>99 </div>100 );101};引入使用:
xxxxxxxxxx171// App.tsx23import "./App.css";4import { useState } from "react";5import { DatePicker } from "../components//DatePicker";67function App() {8 const [date, setDate] = useState<Date | null>(null);910 return (11 <>12 <DatePicker value={date} onChange={setDate} />13 </>14 );15}1617export default App;效果:
11 - Head Tags
如何更改某个页面的meta和title信息?在使用react router的时候,可以这样修改:https://reactrouter.com/start/framework/route-module#meta
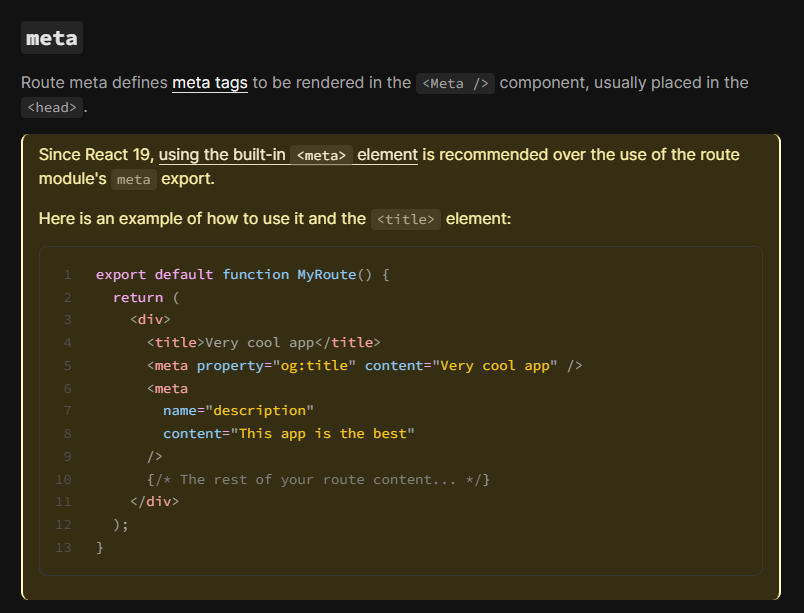
直接添加title和meta元素。
12 - useLayoutEffect
这节课来学习useLayoutEffect。
useLayoutEffect 是一个与 useEffect 签名(函数签名和用法)完全相同的 Hook,但它在 React 的渲染流程中执行的时机是不同的。
useLayoutEffect 主要用于执行那些需要在浏览器进行下一次绘制(paint)之前同步发生的 DOM 操作,例如测量布局、滚动位置或强制同步更新 DOM。
下面用一个例子来说明为什么要使用useLayoutEffect。
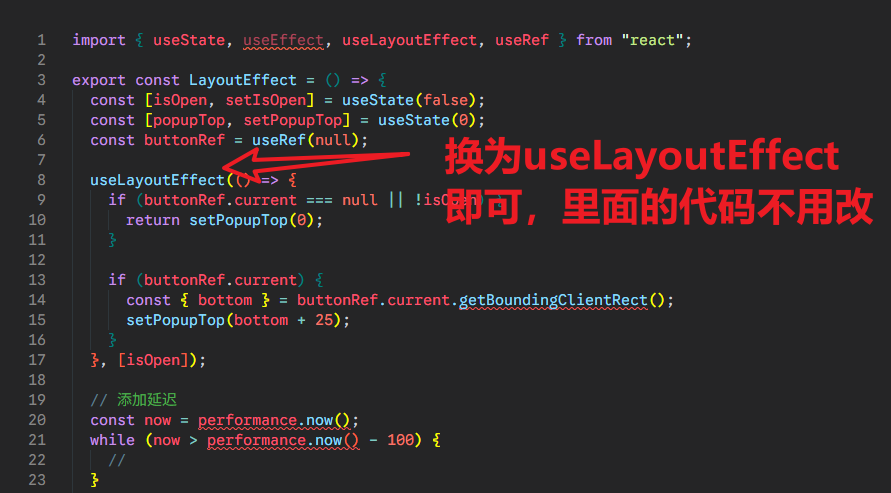
xxxxxxxxxx441// components/LayoutEffect.tsx23import { useState, useEffect, useRef } from "react";45export const LayoutEffect = () => {6 const [isOpen, setIsOpen] = useState(false);7 const [popupTop, setPopupTop] = useState(0);8 const buttonRef = useRef(null);910 useEffect(() => {11 if (buttonRef.current === null || !isOpen) {12 return setPopupTop(0);13 }1415 if (buttonRef.current) {16 const { bottom } = buttonRef.current.getBoundingClientRect();17 setPopupTop(bottom + 25);18 }19 }, [isOpen]);2021 // 添加延迟22 const now = performance.now();23 while (now > performance.now() - 100) {24 //25 }2627 return (28 <>29 <button ref={buttonRef} onClick={() => setIsOpen((o) => !o)}>30 Show31 </button>32 {isOpen && (33 <div34 style={{35 position: "absolute",36 top: `${popupTop}px`,37 border: "1px solid black",38 }}>39 ToolTip40 </div>41 )}42 </>43 );44};可以看到,画面有明显的位移痕迹。
这时候就可以换为useLayoutEffect,它与useEffect的用法完全相同,只是执行机制不同。当看到页面闪动情况时,就要想到它。
可以看到没有闪烁的情况:
那二者的区别是什么呢?就是在react里面执行的时机:
xxxxxxxxxx61React 开始渲染 → 更新 DOM(但还没画到屏幕)23 ├─ useLayoutEffect 同步执行(这里可以读写 DOM)4 └─ 浏览器绘制(paint) → 用户看到画面56 └─ useEffect 异步执行(用户已经看到画面了)官方和社区的推荐用法(2025 年最新共识)
| 场景 | 推荐用哪个 | 原因 |
|---|---|---|
| 发网络请求、埋点、setTimeout、订阅事件 | useEffect | 不需要同步 DOM,异步执行性能更好 |
| 读取 DOM 尺寸(getBoundingClientRect) | useLayoutEffect | 必须在绘制前拿到准确值,否则拿到的是旧值 |
| 根据 DOM 尺寸设置初始状态(弹窗居中、图表 resize) | useLayoutEffect | 防止出现「先偏再居中」的闪烁 |
| 做动画、过渡的初始位置设置 | useLayoutEffect | 避免出现「先闪到错误位置再动画」的 bug |
| 第三方库要求在 DOM 更新后立即操作(比如 echarts.resize) | useLayoutEffect | 确保拿到最新布局 |
| 99% 的普通场景 | useEffect | 性能更好,不阻塞绘制 |
13 - useDebugValue
useDebugValue 是一个 React Hook,它主要的作用是帮助开发者在 React DevTools(React 开发者工具)中显示自定义 Hook 的调试信息(debug value)。
它不会影响你的组件的任何行为、渲染流程或性能。它纯粹是一个调试工具。
当你使用 useState 或 useReducer 时,React DevTools 会自动显示状态的当前值。但是,当你创建自己的自定义 Hook 时,DevTools 只会显示你的 Hook 的名称,而不知道它内部管理了什么状态。
useDebugValue 允许你为自定义 Hook 提供一个清晰、可读的标签,让你能快速检查 Hook 的内部状态。
在发生产时,useDebugValue相关代码都要删除,因为会增加不必要的计算开销。
14 - useId
useId 是 React 18 引入的一个 Hook,它的主要作用是生成稳定且唯一的 ID 字符串,用于将客户端组件与服务器端生成的 HTML 元素进行关联。
这个 Hook 解决了在服务端渲染(SSR)和客户端水合(Hydration)过程中,ID 匹配 和 可访问性(Accessibility) 的关键问题。
15 - How to debug react apps like a senior developer
StrictMode logging tip
在开发过程中,一般都会启动StrictMode,但是控制台输出两次确实很迷惑人,所以可以使用react dev tools的一个选项,将输出控制为一次。
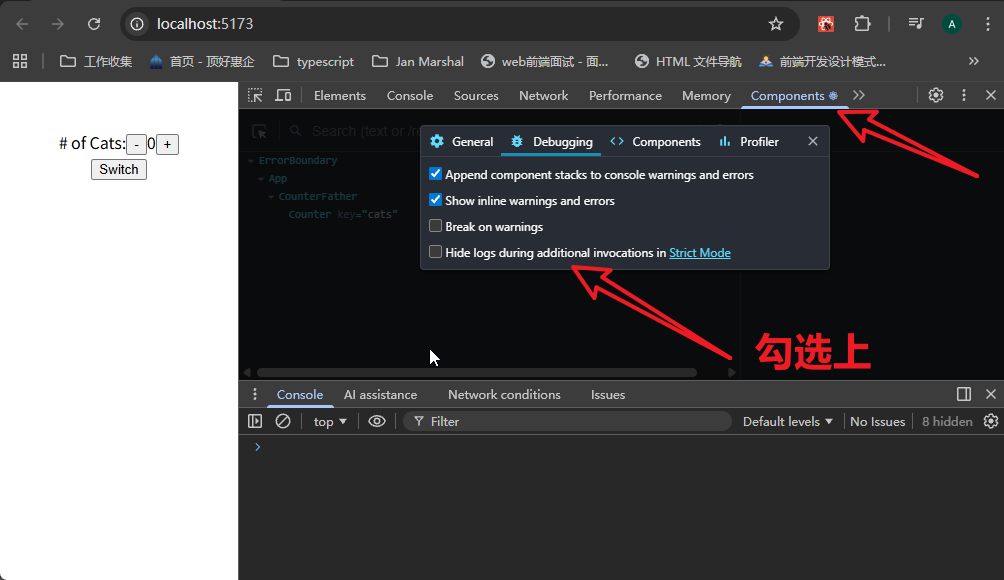
可以看到,只输出了一次。
react dev tools调试
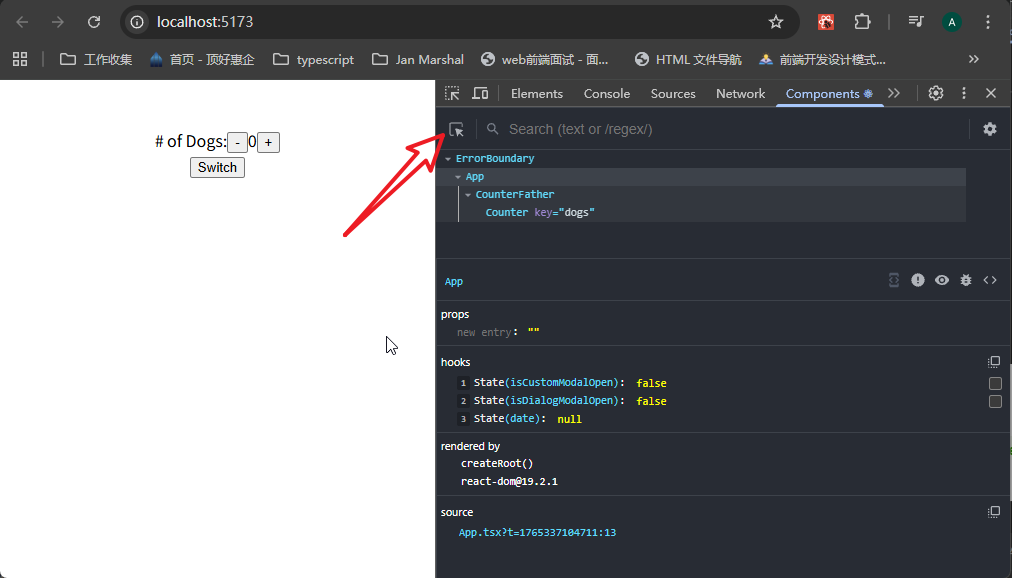
Component面板
真的不需要每次在console.log里面输出,甚至在UI里面输出来调试。直接在Component面板里面查看结果会更好。里面有很多信息。

使用Component面板里面的元素选择器,会提供更多、更准确的信息,而且速度快多了。
当使用Suspense包裹住某个组件时,如果你想测试loading的效果,那么可以使用这个工具:
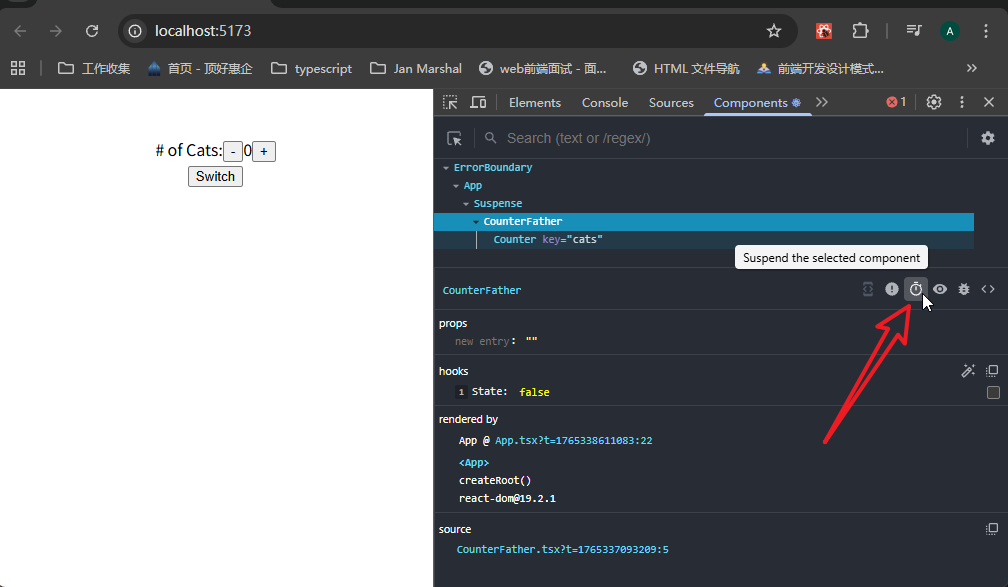
这个工具会暂停选中的组件的渲染,让你查看loading效果。
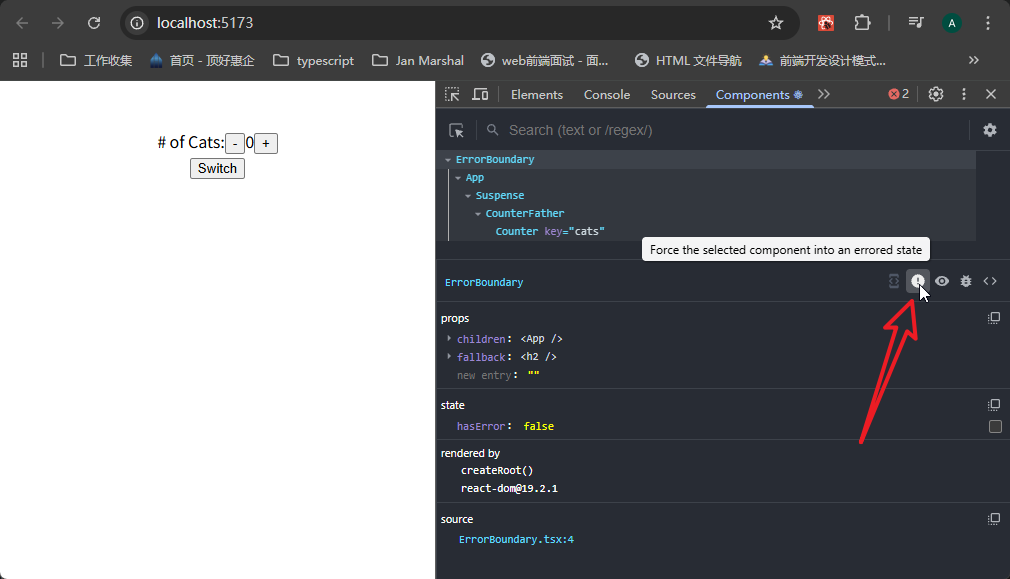
有时候你想查看某个组件报错后会发生什么,或者测试你的ErrorBoundary做好没有,可以使用这个工具,它会强制使选中的组件进入错误状态。
Profile面板
这是一个非常强大的工具,它可以帮助你理解组件的渲染性能,找出应用中的渲染瓶颈。

操作很简单,就是点击开始按钮,然后在页面上操作,操作完成后关闭,就会显示分析结果。
可以看到,很详细的给出了为什么组件rerender的原因,对于分析很有帮助。

16 - Activity组件
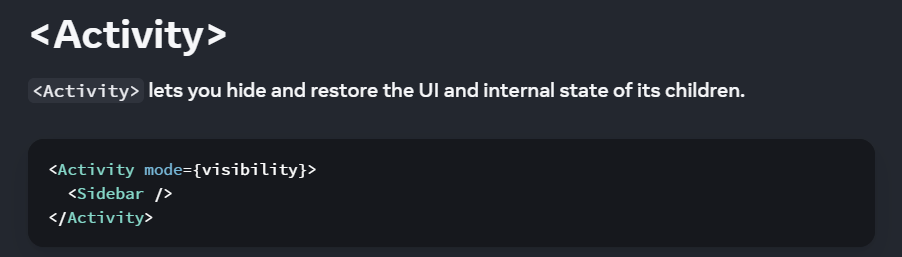
react19新增了Activity组件,可以显示/隐藏里面的子组件,并且保留子组件的UI和内部状态。
一般我们是这样显示/隐藏子组件的:{isVisible && <Counter />},因为会在react组件树中创建/销毁子组件,所以子组件的状态会丢失。
以前的做法
xxxxxxxxxx531// 子组件2// components/activity/Counter.tsx34import { useEffect, useState } from "react";56export const Counter = () => {7 const [count, setCount] = useState(0);89 /**10 *这段 useEffect 确保了:11 组件一旦出现,就开始在整个页面监听点击。12 组件一旦消失,监听器立即被移除。13 14 用于判断子组件是否会真的被注销掉。15 */16 useEffect(() => {17 const controller = new AbortController();18 document.addEventListener(19 "click",20 () => {21 console.log("clicked");22 },23 {24 signal: controller.signal,25 }26 );2728 return () => controller.abort();29 }, []);3031 return (32 <div>33 <div className="text-white font-bold text-3xl mb-4">{count}</div>34 <div className="flex justify-between items-center gap-4 mb-6">35 <button36 onClick={() => setCount((c) => c - 1)}37 className="flex-1 text-white text-xl py-4 bg-white/10 hover:bg-white/20 active:bg-white/30 rounded-2xl transition-all">38 -39 </button>40 <button41 onClick={() => setCount((c) => c + 1)}42 className="flex-1 text-white text-xl py-4 bg-blue-500 hover:bg-blue-600 active:bg-blue-700 rounded-2xl transition-all shadow-lg">43 +44 </button>45 </div>46 <input47 type="text"48 placeholder="Enter a note..."49 className="w-full bg-white/10 border border-white/20 rounded-2xl px-6 py-4 text-white placeholder-white/50 focus:outline-none focus:ring-2 focus:ring-blue-500 focus:border-transparent transition-all"50 />51 </div>52 );53};xxxxxxxxxx201// 父组件2// components/activity/page.tsx34import { useState } from "react";5import { Counter } from "./Counter";67export const ActivityPage = () => {8 const [isVisible, setIsVisible] = useState(false);9 return (10 <div className="w-[400px] bg-[#1f283b] backdrop-blur-xl rounded-3xl shadow-2xl border border-white/20 p-8 space-y-8">11 <button12 className="w-full bg-blue-500 hover:bg-blue-600 active:bg-blue-700 transition-all duration-200 rounded-xl px-8 py-4 text-white font-medium text-lg shadow-lg"13 onClick={() => setIsVisible((v) => !v)}>14 Toggle15 </button>16 <hr className="border-white/70" />17 {isVisible && <Counter />}18 </div>19 );20};可以看到,当切换显示子组件的时候,子组件的状态都丢失了。
Activity基本使用
只需要将父组件的代码这样改就行了:
xxxxxxxxxx61import { Activity } from "react";23{/* {isVisible && <Counter />} */}4<Activity mode={isVisible ? "visible" : "hidden"}>5 <Counter />6</Activity>可以看到,子组件的状态保留了。
其它作用
预渲染即将可见的内容
隐藏内容会以低优先级渲染,适合预加载数据/代码。
When an Activity boundary is hidden during its initial render, its children won’t be visible on the page — but they will still be rendered, albeit at a lower priority than the visible content, and without mounting their Effects.
This pre-rendering allows the children to load any code or data they need ahead of time, so that later, when the Activity boundary becomes visible, the children can appear faster with reduced loading times.
xxxxxxxxxx361import { Activity, useState, Suspense } from 'react';2import TabButton from './TabButton.js';3import Home from './Home.js';4import Posts from './Posts.js';56export default function App() {7 const [activeTab, setActiveTab] = useState('home');89 return (10 <>11 <TabButton12 isActive={activeTab === 'home'}13 onClick={() => setActiveTab('home')}14 >15 Home16 </TabButton>17 <TabButton18 isActive={activeTab === 'posts'}19 onClick={() => setActiveTab('posts')}20 >21 Posts22 </TabButton>2324 <hr />2526 <Suspense fallback={<h1>🌀 Loading...</h1>}>27 <Activity mode={activeTab === 'home' ? 'visible' : 'hidden'}>28 <Home />29 </Activity>30 <Activity mode={activeTab === 'posts' ? 'visible' : 'hidden'}>31 <Posts />32 </Activity>33 </Suspense>34 </>35 );36}这个例子中,Posts组件刚开始是隐藏的,但是由于使用在Activity组件中,它的可见内容会以低优先级的pre-render。
加速页面加载时的交互
在 SSR/SSG 中,<Activity>支持选择性水合(Selective Hydration),让可见部分先交互。比如说在nextjs的server components就可以使用Activity来包裹。优化性能。
17 - How To Use CSS Dev Tools Like a Senior Developer
还是使用CHROME浏览器的调试工具,然后就是elements面板里面的样式。
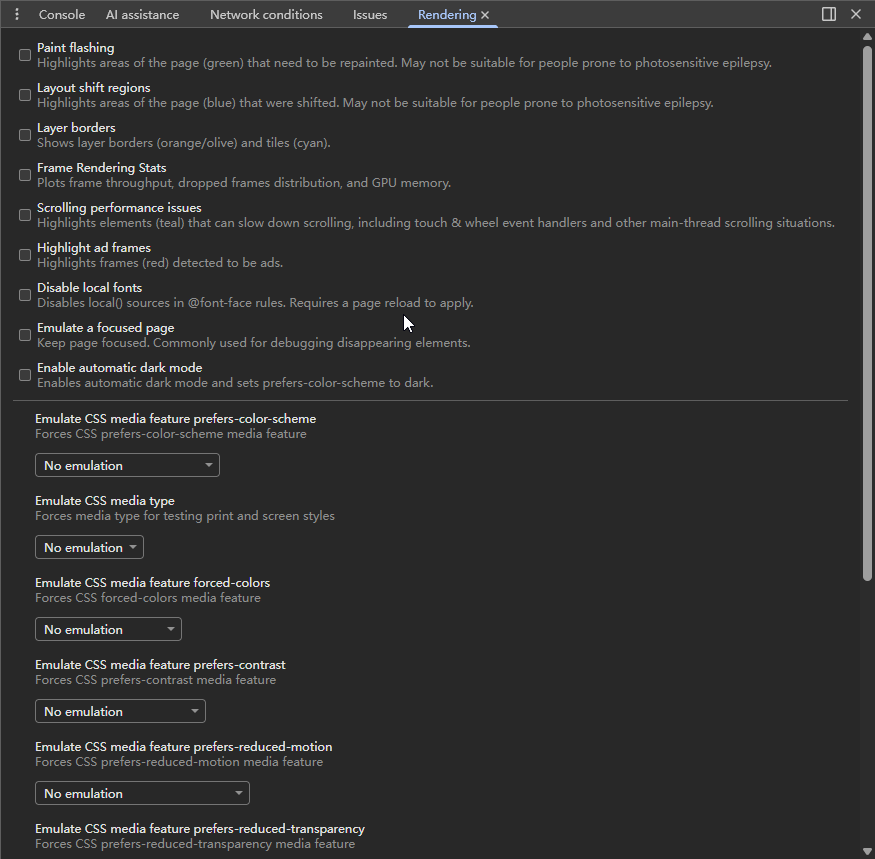
另外,还可以使用ctrl+shift+p,输入rendering,打开这个面板,可以选择一些模拟动作:
输入animation,可以查看页面的动画:
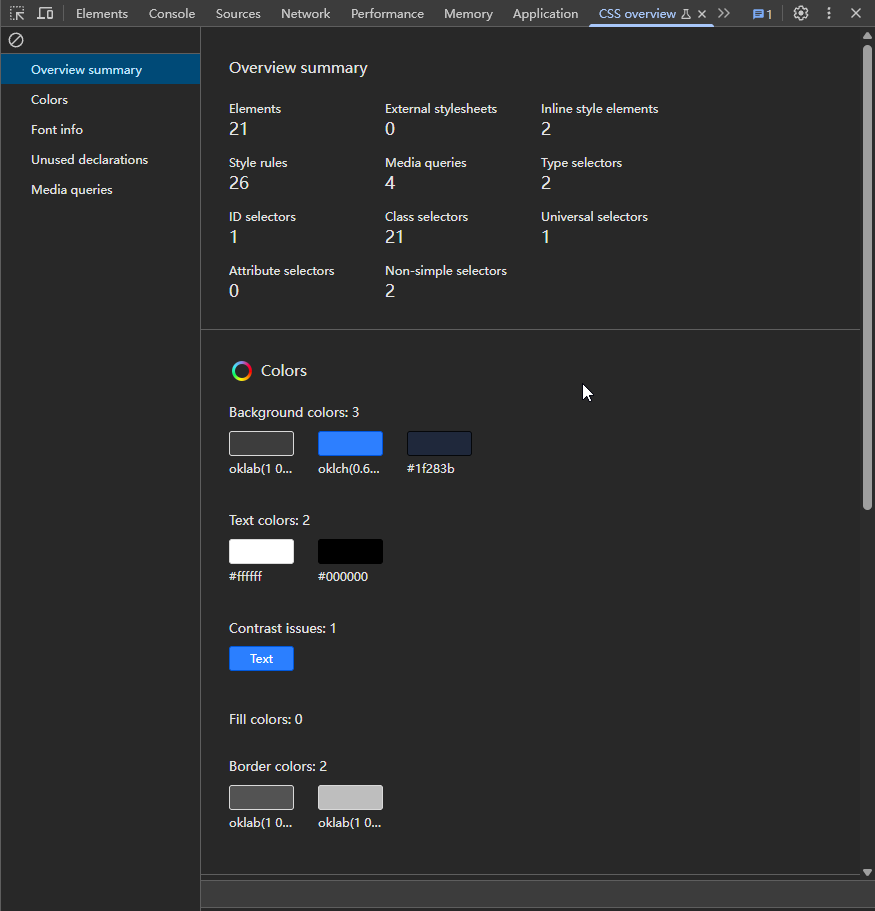
输入CSS overview,可以查看整个网站的样式总览: